Ultimate Open Crumb Sesame Sourdough Loaf Recipe 🥖✨
Crispy Crust • Wild Open Crumb • 90% Hydration Artisan Bread
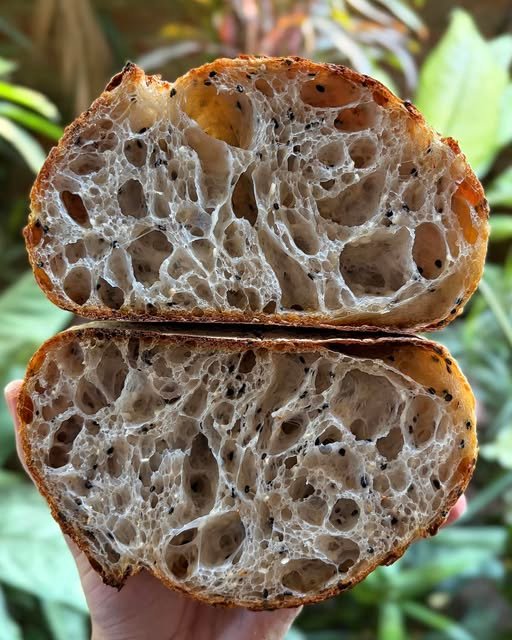
There’s something magical about slicing into a sourdough loaf and seeing those huge airy holes stretching through the crumb. That beautiful web-like texture, the crispy golden crust, and the deep nutty flavor from toasted sesame seeds make this loaf feel like it came straight from a professional bakery.
This recipe is inspired by the famous ultra-open “WTF Sourdough Loaf” style — a bread known for its extreme dough extensibility, high hydration, dramatic oven spring, and giant alveoli. The secret lies in careful fermentation, gentle handling, deep scoring, and strong bottom heat during baking.
If you’ve been chasing that Instagram-worthy sourdough crumb with massive bubbles and a light chewy texture, this recipe is for you. It may look intimidating at first, but once you understand the process, it becomes incredibly rewarding. The smell alone while this loaf bakes is enough to make your kitchen feel like an artisan bakery.
This loaf uses 90% hydration, meaning the dough contains a very high amount of water compared to flour. That extra hydration helps create the soft gelatinized crumb and dramatic open structure. Toasted sesame seeds add an incredible nutty flavor while also bringing slight crunch to every bite.
The result?
A loaf with:
- Crispy caramelized crust
- Thin crackly exterior
- Super airy interior
- Rich fermented flavor
- Gorgeous open crumb
- Toasted sesame aroma
Perfect for toast, sandwiches, olive oil dipping, avocado toast, or simply eating warm with butter.
Why This Sourdough Works
This loaf is all about dough strength balanced with extensibility. Instead of making the dough overly tight, we allow it to stay relaxed enough to expand dramatically in the oven.
Several techniques help create that effect:
1. High Hydration
Using 90% hydration creates a softer dough with more steam potential during baking. This encourages large bubbles and an open crumb structure.
2. Extended Mixing
Mixing slightly longer develops gluten enough to hold shape while still allowing extensibility.
3. Gentle Folding
Three folds during bulk fermentation strengthen the dough without degassing it too much.
4. Proper Bulk Fermentation
Stopping bulk around 75% rise prevents overproofing while still building gas inside the dough.
5. Cold Retard
The overnight cold proof improves flavor and makes scoring easier.
6. High Bottom Heat
The strong heat underneath rapidly expands the dough before the crust sets, creating huge oven spring.
Ingredients
Dough
- 400g bread flour
- 360g water (90% hydration)
- 80g active sourdough starter
- 8g sea salt
- 40g toasted sesame seeds
Equipment
- Dutch oven or baking stone
- Banneton basket or bowl with towel
- Bread lame or sharp razor
- Kitchen scale
- Dough scraper
Step 1: Prepare the Starter
Feed your sourdough starter 4–6 hours before mixing the dough.
Your starter should:
- Be bubbly
- Smell slightly sweet and tangy
- Double in size
A strong starter is essential for achieving an open crumb.
Step 2: Mix the Dough
In a large bowl:
- Combine water and sourdough starter
- Mix until cloudy
- Add flour and mix until no dry flour remains
Let the dough rest for 30 minutes. This process is called autolyse and helps hydrate the flour naturally.
After resting:
- Add salt
- Add toasted sesame seeds
- Mix thoroughly until smooth
Continue mixing slightly longer than normal to improve dough extensibility.
The dough will feel sticky and loose — that’s completely normal for high hydration sourdough.
Step 3: Bulk Fermentation
Cover the dough and let it ferment at around 24°C.
During bulk fermentation:
- Perform 3 sets of folds
- Two folds early during bulk
- One fold halfway through
To fold:
- Wet your hands
- Stretch one side upward
- Fold over itself
- Rotate bowl and repeat
These folds strengthen the gluten network while keeping air inside the dough.
Bulk fermentation may take 4–6 hours depending on room temperature.
The dough should:
- Look airy
- Jiggle slightly
- Rise about 75%
Do not overproof or the dough may collapse.
Step 4: Preshape
Lightly flour your counter and gently turn out the dough.
Using a bench scraper:
- Shape into a loose round
- Avoid pressing out gas bubbles
Let the dough rest uncovered for 30 minutes.
This bench rest allows the gluten to relax before final shaping.
Step 5: Final Shape
Shape the dough carefully into a tight boule.
The goal is surface tension without destroying internal air pockets.
Place the dough seam-side up into a floured banneton basket.
Step 6: Cold Retard
Cover the dough and refrigerate at 2°C for 12 hours.
Cold fermentation:
- Enhances flavor
- Improves scoring
- Strengthens dough structure
- Helps create better oven spring
The next morning, your dough should feel puffy and airy.
Step 7: Preheat the Oven
Preheat your oven thoroughly.
Ideal temperatures:
- Bottom heat: 260°C
- Top heat: 200°C
If using a Dutch oven:
- Preheat for at least 45 minutes
High initial heat is critical for explosive oven spring.
Step 8: Score Deeply
Turn the dough onto parchment paper.
Using a sharp lame:
- Score deeply across the surface
Deep scoring allows the loaf to expand fully instead of bursting randomly.
This step helps create dramatic ear formation and maximum bloom.
Step 9: Bake
Bake with steam or inside a Dutch oven.
Baking Time
- 20 minutes covered
- 20–25 minutes uncovered
The crust should become:
- Deep golden brown
- Crispy
- Slightly blistered
You’ll hear crackling sounds as the loaf cools — the sign of a beautifully baked sourdough.
Step 10: Cool Completely
This is the hardest part.
Allow the loaf to cool at least 1 hour before slicing.
Cutting too early can make the crumb gummy.
Once sliced, you’ll reveal:
- Massive open alveoli
- Glossy interior
- Thin translucent crumb walls
Exactly what makes this style of sourdough so special.
Flavor & Texture
This loaf has:
- Mild tanginess
- Toasted nutty sesame flavor
- Chewy airy crumb
- Crispy crust
The high hydration gives the bread an almost custardy interior while remaining incredibly light.
Serving Ideas
This sourdough is amazing with:
- Salted butter
- Olive oil
- Avocado
- Honey
- Soup
- Eggs
- Cheese boards
It also makes incredible artisan sandwiches.
Tips for an Open Crumb
Use Strong Bread Flour
Higher protein flour helps support large air pockets.
Don’t Rush Fermentation
Proper fermentation is the key to structure and flavor.
Handle Gently
Avoid pressing out gas during shaping.
Use High Heat
Strong oven spring creates bigger holes.
Practice Patience
Open crumb sourdough takes practice, but every loaf teaches you something.
Final Thoughts
Making an ultra-open crumb sourdough loaf is part science, part art, and part patience. Every step — from fermentation to shaping to baking — contributes to the final structure inside the loaf.
This sesame sourdough is more than just bread. It’s a bakery-style artisan experience made right in your own kitchen. The crispy crust, airy crumb, and deep fermented flavor make every slice unforgettable.
Once you master this loaf, you’ll never look at store-bought bread the same way again 🥖✨


