Homemade Artisan Bread Recipe – Soft Inside & Crispy Outside 🍞
There is something truly special about homemade bread fresh out of the oven. The smell alone can make the whole house feel warm and comforting. This Homemade Artisan Bread Recipe is perfect for anyone who loves soft fluffy bread with a golden crispy crust. The inside is light and airy while the outside has that beautiful bakery-style texture everyone loves. Best of all, this bread is made with simple ingredients you probably already have in your kitchen.
Many people think homemade bread is difficult to make, but this recipe is actually very beginner-friendly. You do not need expensive equipment or professional baking skills. With a little patience and a few basic steps, you can create a beautiful loaf that looks and tastes amazing.
This bread is perfect for breakfast with butter and jam, for sandwiches, or served warm with soup and pasta. Once you try making homemade bread yourself, it is hard to go back to store-bought bread again. The flavor, texture, and freshness are simply unbeatable.
Why You’ll Love This Bread Recipe
One of the best things about this artisan bread recipe is its simplicity. It uses basic pantry ingredients and still creates incredible results. The bread comes out with a crispy golden crust while staying soft and chewy inside.
Here are a few reasons why this recipe is worth trying:
- Soft and fluffy texture
- Crispy bakery-style crust
- Easy for beginners
- Made with simple ingredients
- Perfect for sandwiches and toast
- No special mixer required
- Family-friendly and budget-friendly
This bread is also very versatile. You can enjoy it plain, add herbs for extra flavor, or even turn it into garlic bread.
Ingredients
To make this delicious homemade bread, you will need:
- 3 cups all-purpose flour
- 1 packet instant yeast (2¼ teaspoons)
- 1 tablespoon sugar
- 1½ teaspoons salt
- 1 cup warm water
- 2 tablespoons milk
- 2 tablespoons butter or oil
Optional:
- Melted butter for brushing
- Sesame seeds or herbs for topping
Kitchen Tools Needed
You do not need fancy equipment for this recipe, but these tools will help:
- Mixing bowl
- Measuring cups and spoons
- Loaf pan
- Clean kitchen towel
- Sharp knife or bread lame
- Cooling rack
Step-by-Step Instructions
Step 1: Activate the Yeast
In a large mixing bowl, combine the warm water, sugar, and yeast. Stir gently and let it sit for about 5–10 minutes.
The mixture should become foamy on top. This means the yeast is active and ready to use. If it does not foam, your yeast may be expired or the water may have been too hot.
Step 2: Make the Dough
Add the flour, salt, milk, and butter into the yeast mixture.
Mix everything together using a spoon or your hands until a soft dough forms. The dough should feel slightly sticky but manageable.
If the dough feels too dry, add a little extra water. If it feels too wet, sprinkle in a little flour.
Step 3: Knead the Dough
Transfer the dough onto a lightly floured surface.
Knead the dough for about 8–10 minutes until it becomes smooth and elastic. Kneading helps develop gluten which gives the bread its chewy texture.
If you press the dough gently and it bounces back, it is ready.
Step 4: First Rise
Place the dough into a lightly greased bowl.
Cover it with a clean towel or plastic wrap and let it rise in a warm place for 1–2 hours, or until doubled in size.
This step is important because it allows the bread to become light and airy.
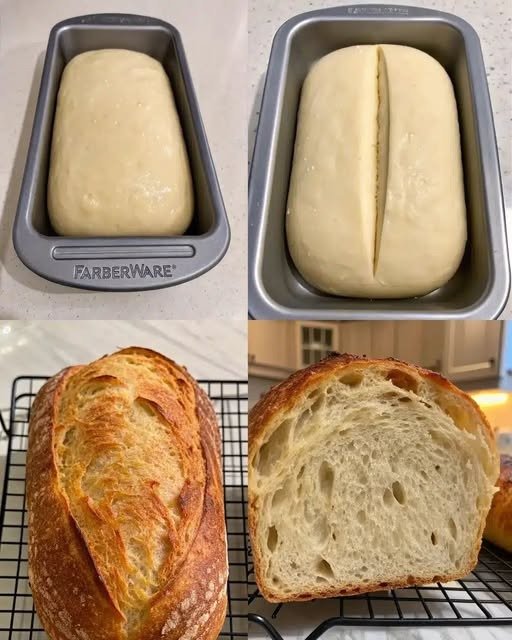
Step 5: Shape the Dough
Once the dough has risen, gently punch it down to remove excess air.
Shape it into a loaf by folding the dough tightly. Place it into a greased loaf pan.
Try to shape it evenly so the bread bakes nicely.
Step 6: Second Rise
Cover the loaf again and let it rise for another 30–40 minutes.
The dough should puff up beautifully and fill the loaf pan.
Step 7: Score the Bread
Using a sharp knife, make one long cut across the top of the dough.
This scoring helps the bread expand properly in the oven and also gives it that classic artisan look.
Step 8: Bake the Bread
Preheat your oven to 375°F (190°C).
Bake the bread for 30–35 minutes until the top becomes golden brown and crispy.
The bread should sound hollow when tapped on the bottom.
Step 9: Cool Before Slicing
Remove the bread from the pan and place it on a cooling rack.
Let it cool for at least 20 minutes before slicing. This helps the inside finish setting properly.
Tips for Perfect Homemade Bread
Use Warm Water
The water should feel warm but not hot. Water that is too hot can kill the yeast.
Do Not Add Too Much Flour
Too much flour can make the bread dense and dry. The dough should stay slightly soft.
Be Patient with Rising Time
Bread dough rises differently depending on room temperature. If your kitchen is cold, the dough may need extra time.
Brush with Butter
For a softer crust, brush melted butter over the bread right after baking.
Flavor Variations
One of the best things about homemade bread is how customizable it is.
Garlic Herb Bread
Add garlic powder and dried herbs to the dough for extra flavor.
Cheese Bread
Mix shredded cheddar or mozzarella into the dough.
Honey Bread
Replace sugar with honey for a slightly sweet flavor.
Whole Wheat Bread
Replace half the all-purpose flour with whole wheat flour for a healthier version.
How to Store Homemade Bread
Homemade bread stays fresh for about 2–3 days at room temperature.
- Store it in an airtight container or bread bag
- Keep it away from direct sunlight
- Avoid refrigerating because it can dry out the bread
For longer storage, slice and freeze the bread for up to 2 months.
What to Serve with Homemade Bread
This bread pairs perfectly with so many foods:
- Butter and jam
- Soup and stew
- Pasta dishes
- Grilled cheese sandwiches
- Garlic butter
- Peanut butter
- Scrambled eggs
It is also amazing toasted for breakfast.
Frequently Asked Questions
Why is my bread dense?
Dense bread usually happens because the dough did not rise long enough or too much flour was added.
Can I use active dry yeast?
Yes, but you may need to let it activate slightly longer.
Can I make this bread without a loaf pan?
Absolutely. You can shape it into a round artisan loaf and bake it on a baking tray.
How do I know when the bread is fully baked?
The crust should be golden brown and the loaf should sound hollow when tapped.
Final Thoughts
Making homemade artisan bread is one of the most satisfying baking experiences. Watching simple ingredients turn into a beautiful golden loaf feels truly rewarding. This bread recipe is easy, delicious, and perfect for both beginners and experienced bakers.
The crispy crust and soft fluffy inside make it taste just like bakery bread, but even better because it is fresh and homemade. Whether you enjoy it warm with butter or use it for sandwiches, this bread will quickly become a favorite in your kitchen.
Once you bake your own bread at home, you may never want store-bought bread again ❤️


