Floral Art Sourdough Bread Recipe 🌸🍞
There’s something incredibly special about turning homemade sourdough bread into edible art. This floral painted sourdough loaf combines beautiful design with classic artisan bread, creating a loaf that feels almost too pretty to slice.
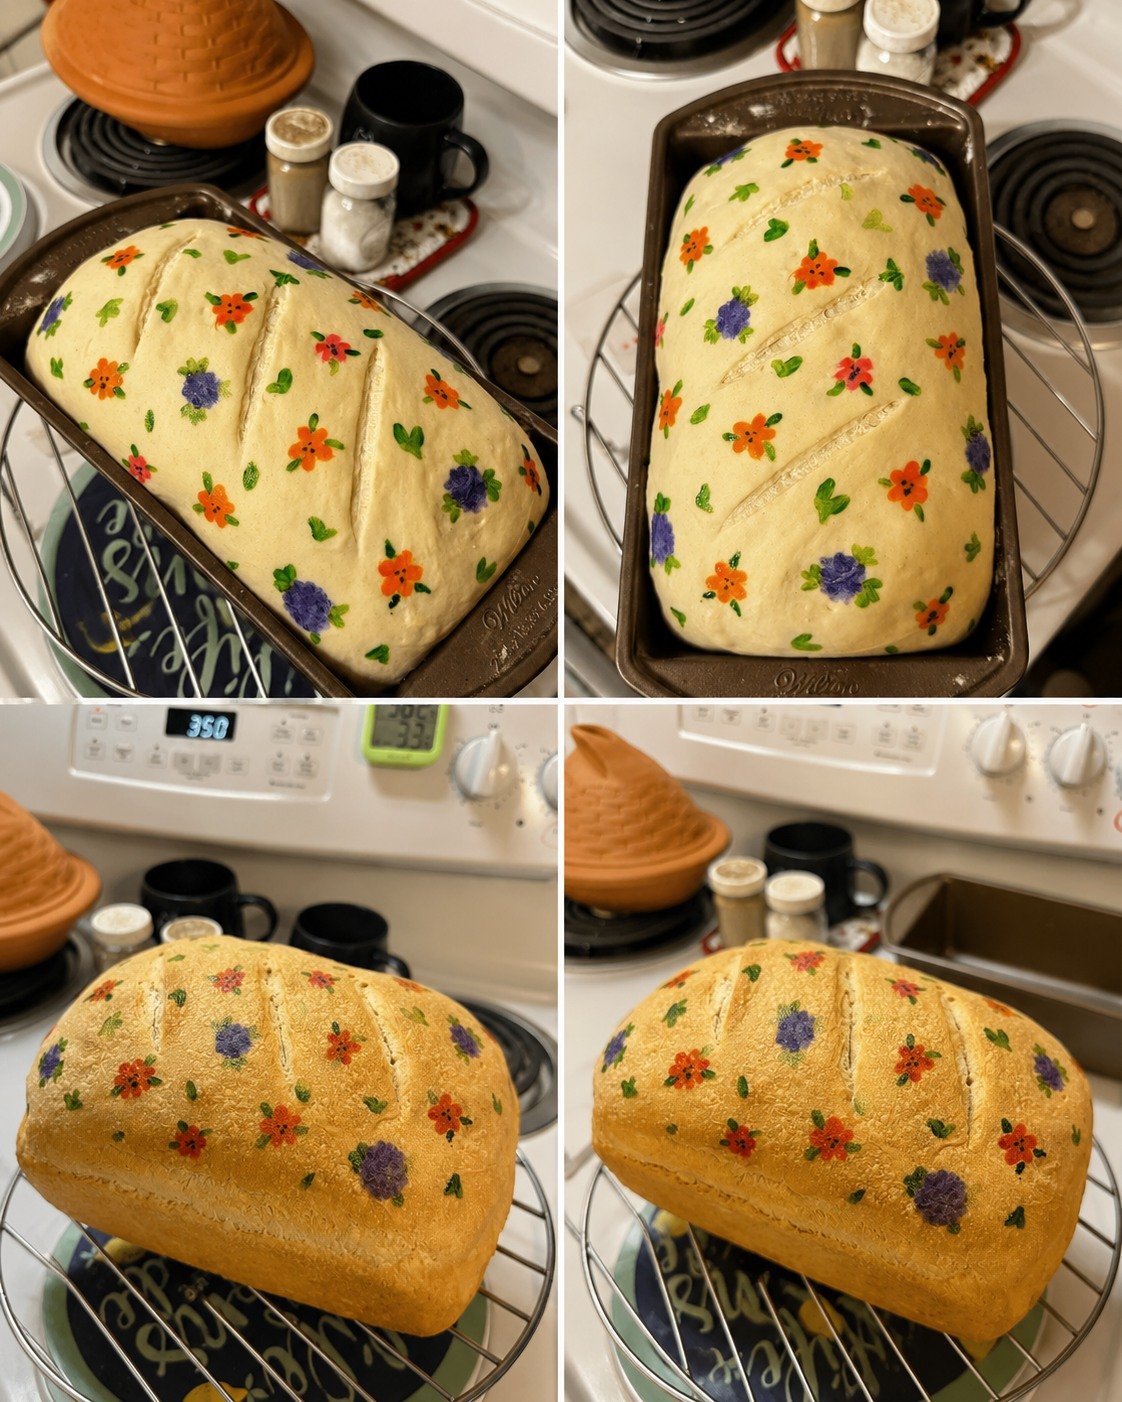
For this bake, the flower design was painted directly onto the dough using food coloring before baking. Even though the design may not come out perfect the first time, that’s part of the fun. Decorative sourdough is all about creativity, experimenting, and learning new techniques with every loaf.
If you’ve ever wanted to make artistic sourdough bread with hand-painted flowers, this beginner-friendly guide will help you create a stunning loaf while still achieving that crispy crust and soft chewy crumb sourdough lovers adore.
Why You’ll Love Decorative Sourdough
This floral sourdough loaf is:
- Beautiful and creative
- Fun to customize
- Perfect for special occasions
- Beginner-friendly artistic bread
- Crispy on the outside and soft inside
- A unique way to elevate sourdough baking
Every loaf becomes completely one-of-a-kind.
Ingredients
For the Dough
- 500g bread flour
- 350g water
- 100g active sourdough starter
- 10g salt
For the Floral Design
- Gel food coloring
- Small paint brushes
- Optional: flour for mixing into paint paste
Gel coloring works best because it’s more concentrated and vibrant than liquid food coloring.
Why the Food Coloring Bled
One common challenge when painting sourdough is color bleeding during fermentation or baking.
This usually happens because:
- The dough surface contains moisture
- Liquid coloring spreads naturally
- Thin coloring absorbs into soft dough
A simple trick for cleaner designs is mixing gel coloring with a tiny bit of flour.
This creates a thicker edible paint that sits more cleanly on the surface instead of soaking into the dough.
Many decorative sourdough bakers use this technique for sharper details.
Step 1: Mix the Dough
In a large bowl, combine:
- Bread flour
- Water
- Active sourdough starter
Mix until no dry flour remains.
Let the dough rest for 30 minutes.
This rest period helps hydrate the flour and improves gluten development.
Step 2: Add Salt
Add the salt and gently work it into the dough.
The dough will feel smoother and stronger after mixing.
Cover and begin bulk fermentation.
Step 3: Stretch and Folds
Over the next 2–3 hours, perform stretch and folds every 30 minutes.
To do this:
- Pull one side of the dough upward
- Fold it over the center
- Rotate and repeat
This builds gluten strength naturally without kneading.
As fermentation continues, the dough becomes smoother, airier, and more elastic.
Step 4: Bulk Fermentation
Allow the dough to ferment until it becomes:
- Puffy
- Jiggly
- Lightly airy
Depending on room temperature, this usually takes around 4–6 hours.
Do not rush fermentation — good sourdough always takes patience.
Step 5: Shape the Dough
Turn the dough onto a lightly floured surface and shape it gently into a round loaf.
Create surface tension without deflating the dough too much.
Place it seam-side up into a floured banneton or bowl lined with a towel.
Step 6: Cold Proof
Transfer the dough to the refrigerator for overnight proofing.
Cold dough is much easier to score and decorate because the surface becomes firmer.
This also improves flavor and crust development.
Step 7: Paint the Floral Design 🎨
Before baking, remove the dough from the fridge and carefully turn it onto parchment paper.
Using small food-safe brushes, paint floral designs directly onto the dough.
Ideas include:
- Flowers
- Leaves
- Vines
- Petals
- Wildflower patterns
For cleaner lines, mix gel coloring with a little flour to create a soft paste consistency.
This helps reduce bleeding and gives the artwork more definition.
Remember:
Decorative sourdough takes practice. Every loaf teaches you something new.
Step 8: Score the Bread
Using a bread lame or sharp blade, score the loaf carefully.
Try placing the score around the design so the artwork remains visible after baking.
Decorative scoring can make the loaf even more beautiful.
Step 9: Bake the Sourdough
Preheat your oven and Dutch oven to:
450∘F
Bake:
- 20 minutes covered
- 20–25 minutes uncovered
The covered bake traps steam, helping create oven spring and a crispy crust.
The uncovered portion develops deep golden color and texture.
What to Expect After Baking
The final loaf should have:
- Crispy artisan crust
- Soft chewy crumb
- Light tangy flavor
- Beautiful rustic floral artwork
Some colors may soften slightly during baking, giving the loaf a watercolor-style appearance.
That handmade look is part of the charm.
Tips for Better Painted Sourdough
Use Cold Dough
Cold dough is easier to decorate cleanly.
Keep Paint Thick
Thin liquid coloring spreads too easily.
Practice Simple Designs First
Flowers and leaves are perfect beginner patterns.
Avoid Too Much Moisture
Too much liquid causes bleeding.
Don’t Overwork the Surface
Gentle handling preserves fermentation bubbles.
Creative Design Ideas
Once you get comfortable painting sourdough, try:
- Sunflowers
- Roses
- Lavender stems
- Mushrooms
- Butterflies
- Seasonal holiday designs
The possibilities are endless.
Final Thoughts 🌸✨
This floral painted sourdough loaf is proof that bread baking can also be art. Even if the first attempt isn’t perfect, every decorative loaf helps build confidence and creativity.
The beauty of sourdough is that no two loaves are ever exactly alike. Imperfections, soft brush strokes, and rustic details are what make handmade bread feel special.
So keep experimenting, keep painting, and most importantly — enjoy the process. Because creating something beautiful and delicious at the same time is one of the best parts of sourdough baking 🍞🎨


