My Go-To Sourdough Master Recipe 🍞✨
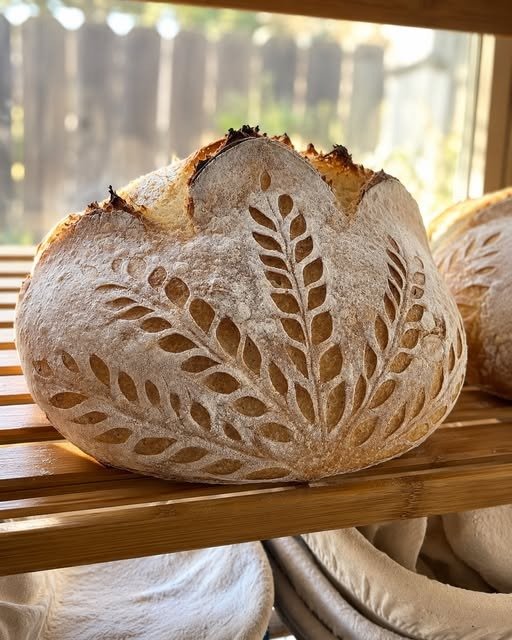
After lots of practice, testing, and learning from every loaf, this sourdough master recipe has become my favorite reliable method. It’s simple, beginner-friendly, and creates a beautiful artisan loaf with a crispy golden crust and soft airy crumb every single time.
If you’ve been looking for a dependable sourdough bread recipe that’s easy to follow and full of flavor, this is the one to save. With just four basic ingredients and a little patience, you can create bakery-style sourdough bread right at home.
Why You’ll Love This Recipe
This sourdough loaf is:
- Crispy on the outside
- Soft and chewy inside
- Full of classic sourdough flavor
- Simple enough for beginners
- Perfect for sandwiches or toast
- Reliable and easy to repeat
The long fermentation gives the bread incredible flavor while the Dutch oven creates that beautiful artisan crust.
Ingredients
- 100g active established sourdough starter
- 350g warm filtered water
- 500g King Arthur unbleached bread flour
- 10g salt
Simple ingredients, amazing results.
Equipment Needed
- Large mixing bowl
- Banneton basket or towel-lined bowl
- Dutch oven
- Bread lame or sharp knife
- Kitchen scale
Using a scale helps keep measurements accurate and consistent.
Step 1: Mix the Dough
In a large bowl, combine the sourdough starter and warm filtered water.
Mix until the starter dissolves and the mixture looks smooth and milky.
Add the bread flour and salt.
Mix until a shaggy dough forms and no dry flour remains.
Cover the bowl and let the dough rest for:
1 hour
This resting period helps hydrate the flour and begins gluten development naturally.
Step 2: Stretch and Folds
Perform 4 rounds of stretch and folds, spacing each round about 30 minutes apart.
To do this:
- Grab one side of the dough
- Stretch it upward gently
- Fold it back over the center
- Rotate and repeat
The dough will gradually become smoother, stronger, and more elastic after each round.
This process builds structure without traditional kneading.
Step 3: Bulk Fermentation
After the final stretch and fold, leave the dough covered on the counter to bulk ferment for another:
4–6 hours
The dough is ready when it becomes:
- Puffy
- Airy
- Bubbly
- About 75% larger in size
Fermentation timing depends heavily on room temperature, so always watch the dough more than the clock.
Step 4: Shape the Dough
Turn the dough onto a lightly floured surface.
Shape it into a tight round loaf while creating gentle surface tension.
Place the dough seam-side up into a floured banneton basket or towel-lined bowl.
This helps the loaf hold its shape during proofing.
Step 5: Cold Proof Overnight
Cover the dough and refrigerate for:
12–24 hours
This overnight cold fermentation improves:
- Flavor
- Texture
- Scoring
- Crust development
Cold dough is also much easier to handle and score cleanly.
Step 6: Score and Bake
Preheat your Dutch oven to:
450∘F
Turn the cold dough onto parchment paper and score the top using a bread lame or sharp knife.
The score allows the bread to expand properly in the oven.
Place the dough into the hot Dutch oven.
Bake:
- 30 minutes covered
- 15 minutes uncovered
The covered portion traps steam for maximum oven spring, while uncovering helps develop that deep golden crust.
Step 7: Cool Before Slicing
This step is important.
Allow the bread to cool completely before cutting into it.
Fresh bread continues cooking internally as it cools, and slicing too early can make the crumb gummy.
Patience makes a huge difference.
Tips for Better Sourdough
Use an Active Starter
Your starter should double or triple after feeding before baking.
Don’t Rush Fermentation
Fermentation creates flavor and texture.
Cold Proof for Better Results
Longer cold proofing improves both taste and appearance.
Practice Scoring
Scoring gets easier with every loaf.
What Makes This Recipe Reliable
This recipe works so well because it balances:
- Hydration
- Fermentation
- Gluten strength
- Baking temperature
It creates a loaf that’s forgiving enough for beginners while still producing bakery-quality results.
Serving Ideas
This sourdough bread is perfect for:
- Toast with butter
- Sandwiches
- Avocado toast
- Soup side dishes
- French toast
- Bruschetta
Or simply warm with salted butter.
Final Thoughts 🍞✨
This sourdough master recipe is the perfect foundation for anyone wanting to bake beautiful artisan bread at home. It’s simple, dependable, and incredibly rewarding from start to finish.
Every loaf gets better with practice, and once you learn how the dough should look and feel, sourdough baking becomes less intimidating and much more enjoyable.
There’s nothing quite like pulling a golden homemade sourdough loaf from the oven and knowing you made it completely from scratch 🥖🤍


