Homemade Oat and Nut Bars Recipe
There’s something incredibly comforting about a homemade snack that fills your kitchen with the warm aroma of toasted oats, nuts, cinnamon, and honey. These Homemade Oat and Nut Bars are the kind of treat you make once and instantly add to your weekly routine. They’re wholesome, chewy, lightly crunchy, naturally sweetened, and packed with nourishing ingredients that keep you satisfied for hours.
Unlike many store-bought granola bars loaded with preservatives and excess sugar, these bars are made with simple pantry staples you can actually recognize. Every bite is filled with hearty rolled oats, crunchy almonds and walnuts, creamy nut butter, and just the right amount of sweetness from honey or maple syrup. They’re perfect for breakfast on busy mornings, afternoon snacks, lunchboxes, road trips, or even as a healthy dessert.
What makes this recipe even better is how customizable it is. You can mix in chocolate chips, dried fruits, seeds, coconut, or even protein powder depending on your cravings and nutritional goals. Whether you prefer soft and chewy bars or crispier toasted edges, this recipe can easily be adjusted to your liking.
If you’ve been searching for the ultimate homemade energy bar recipe that tastes amazing and is easy to prepare, these Oat and Nut Bars deserve a permanent place in your kitchen.
Why You’ll Love These Oat and Nut Bars
These bars are more than just a healthy snack. They’re the perfect combination of flavor, texture, and nutrition.
Here’s why people love them:
- Made with wholesome ingredients
- Naturally sweetened with honey or maple syrup
- Rich in fiber and healthy fats
- Great for meal prep
- Easy to customize
- Freezer-friendly
- Perfect for breakfast or snacking
- Better than store-bought granola bars
The toasted nuts add a deep nutty flavor while the oats create that hearty, chewy texture everyone loves. The nut butter ties everything together beautifully and makes every bite rich and satisfying.
Recipe Overview
Prep Time: 15 minutes
Cook Time: 25 minutes
Cooling Time: 20 minutes
Total Time: 1 hour
Yield: 12 bars
Difficulty: Easy
Ingredients
Dry Ingredients
- 2 cups rolled oats
- ½ cup chopped almonds
- ½ cup chopped walnuts
- ⅓ cup sunflower seeds (optional)
- ¼ teaspoon salt
- 1 teaspoon cinnamon powder
Wet Ingredients
- ½ cup honey or pure maple syrup
- ⅓ cup coconut oil, melted
- 1 teaspoon vanilla extract
- ½ cup natural peanut butter or almond butter
Optional Add-Ins
- ¼ cup dark chocolate chips
- ¼ cup dried cranberries or raisins
- 2 tablespoons chia seeds or flax seeds
Step-by-Step Instructions
Step 1: Prepare the Baking Pan
Begin by preheating your oven to 350°F (175°C). Prepare an 8×8-inch baking pan by lining it with parchment paper. Leave a little extra parchment hanging over the edges so you can easily lift the bars out later.
For extra insurance against sticking, lightly grease the parchment paper with coconut oil or cooking spray.
This small step makes removing and slicing the bars much easier once they’ve cooled.
Step 2: Toast the Oats and Nuts
One of the secrets to making truly delicious oat bars is toasting the oats and nuts before mixing everything together.
Spread the rolled oats, chopped almonds, and walnuts evenly on a baking tray. Place them in the oven for about 8 to 10 minutes, stirring halfway through.
As they toast, your kitchen will fill with a rich nutty aroma that instantly makes these bars taste more homemade and flavorful.
Toasting also improves texture by giving the bars a slight crunch while enhancing the natural sweetness of the oats and nuts.
Once lightly golden, remove the tray from the oven and allow the mixture to cool slightly.
Step 3: Make the Sticky Binding Mixture
In a medium saucepan over low heat, combine:
- Honey or maple syrup
- Melted coconut oil
- Peanut butter or almond butter
- Vanilla extract
Stir continuously for about 3 to 4 minutes until everything becomes smooth and glossy.
Avoid boiling the mixture. Gentle heat is all you need to melt the ingredients together.
This warm mixture acts as the glue that holds your bars together while adding richness and natural sweetness.
After mixing, remove the saucepan from the heat and let it cool slightly for a couple of minutes.
Step 4: Combine the Ingredients
In a large mixing bowl, add the toasted oats and nuts along with the salt and cinnamon.
Pour the warm wet mixture over the dry ingredients and stir thoroughly using a spatula or wooden spoon.
Make sure every oat and nut gets evenly coated.
If you’re adding extras like chocolate chips, raisins, cranberries, chia seeds, or flax seeds, wait until the mixture cools slightly before folding them in. This prevents the chocolate from melting completely.
At this stage, the mixture should feel sticky but manageable.
Step 5: Press into the Pan
Transfer the mixture into your prepared baking pan.
Using the back of a spoon, spatula, or your hands, firmly press the mixture down into an even layer.
This step is extremely important because tightly packed bars hold together much better after baking.
For easier pressing, place a piece of parchment paper over the top and press down firmly.
Take your time here because compact bars slice beautifully and won’t crumble apart later.
Step 6: Bake Until Golden
Place the pan in the preheated oven and bake for 20 to 25 minutes.
For softer and chewier bars, bake closer to 20 minutes.
For crispier bars with crunchier edges, leave them in for the full 25 minutes.
You’ll know they’re ready when the edges become golden brown and the top looks lightly toasted.
The smell at this point is absolutely incredible — warm honey, cinnamon, roasted nuts, and oats all blending together perfectly.
Step 7: Cool Completely Before Slicing
Once baked, remove the pan from the oven and place it on a cooling rack.
Allow the bars to cool completely before slicing. This step is essential because the bars continue to firm up as they cool.
After about 20 to 30 minutes, lift the bars out using the parchment paper overhang and place them on a cutting board.
Use a sharp knife to cut them into 12 bars or 16 smaller snack-sized squares.
You’ll get clean slices with perfectly chewy centers and lightly crisp edges.
Storage Tips
These bars are excellent for meal prep because they store beautifully.
Room Temperature
Keep them in an airtight container for up to 5 days.
Refrigerator
Store for up to 10 days for a firmer texture.
Freezer
Wrap each bar individually in parchment paper and freeze for up to 3 months.
When ready to eat, thaw at room temperature for about 15 minutes.
Delicious Variations
One of the best things about this recipe is how flexible it is.
Chocolate Version
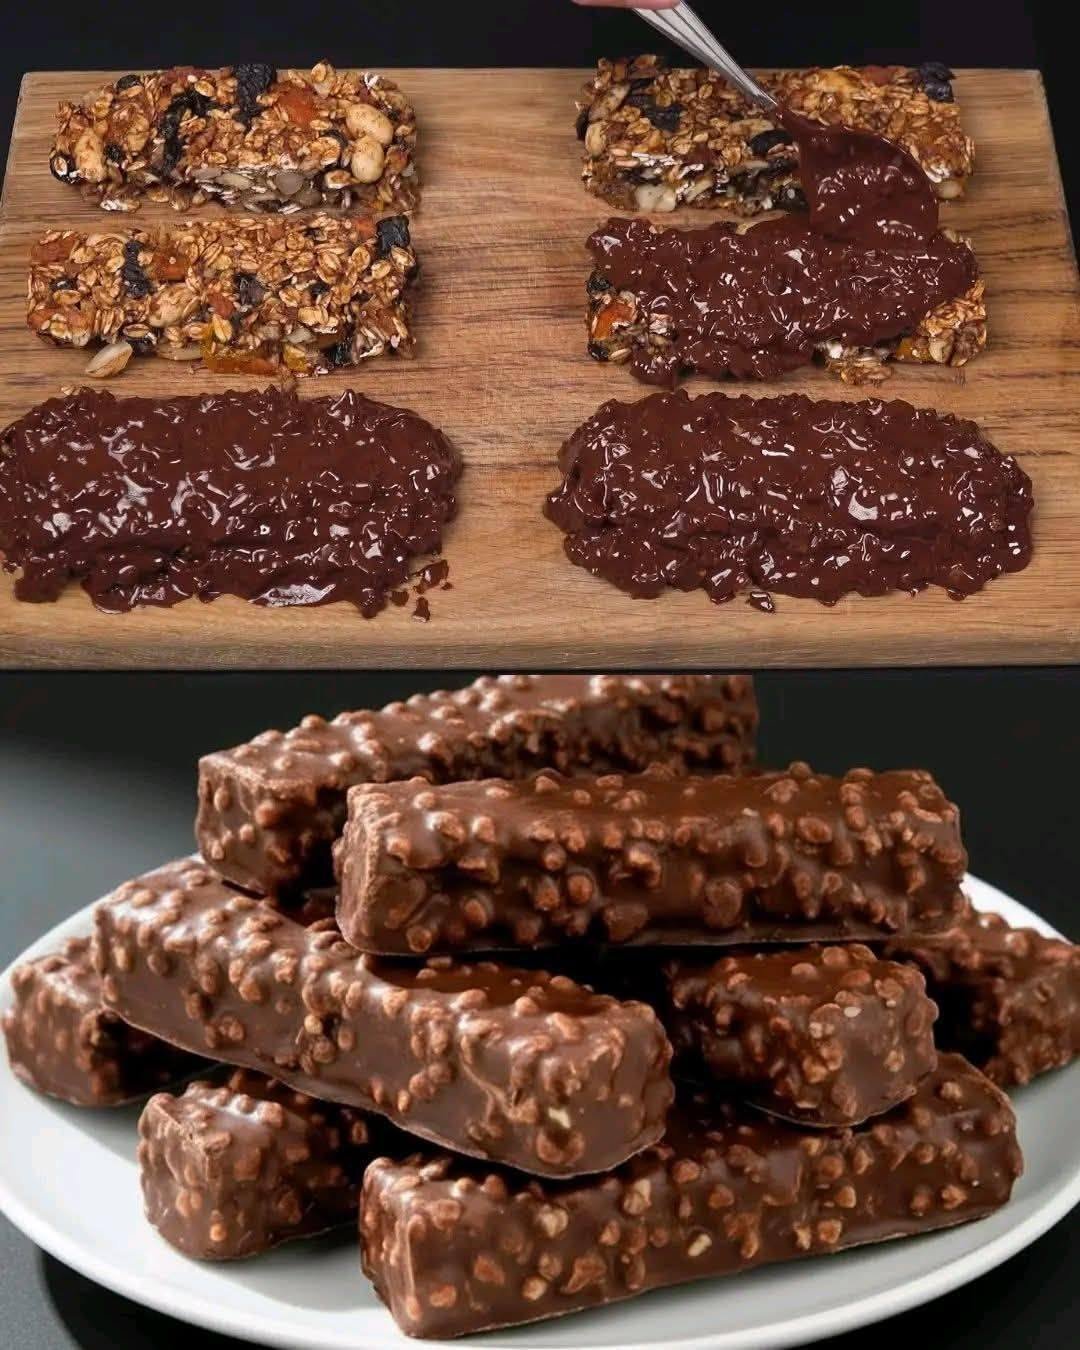
Add cocoa powder and drizzle melted dark chocolate on top.
Tropical Style
Mix in shredded coconut, dried pineapple, and macadamia nuts.
Protein-Packed Bars
Add vanilla protein powder and reduce the oats slightly.
Fruity Breakfast Bars
Include chopped dates, raisins, dried cherries, or cranberries.
You can truly make these bars your own depending on what ingredients you have available.
Serving Ideas
These Oat and Nut Bars are perfect:
- With morning coffee or tea
- After workouts
- As an afternoon snack
- In lunchboxes
- Crumbled over yogurt
- Served with smoothies
- During road trips or travel
They’re portable, filling, and energizing.
Final Thoughts
Homemade Oat and Nut Bars are proof that healthy snacks don’t have to be boring. They’re chewy, crunchy, naturally sweet, and filled with nourishing ingredients that taste just as good as they make you feel.
Whether you enjoy them for breakfast, dessert, or a quick snack during a busy day, these bars deliver flavor, texture, and nutrition in every bite.
Once you try making them from scratch, you’ll realize how much fresher and tastier homemade bars are compared to packaged versions from the store.
Simple ingredients, easy preparation, and endless customization options make this recipe one you’ll return to again and again.


